
C++, OpenGL and more...
 Megabyte Softworks Facebook
 Megabyte Softworks Patreon
Hello guys and welcome to 20th OpenGL4 tutorial! I'm really glad that the tutorial numbers ramp up in a relatively quick fashion and I really want to keep at least such pace  . This one should be pretty simple in contrast to the previous one - we are only going to implement just one simple effect and it's fog. With fog, we can really add a lot to the atmosphere of a game or scenery - if you want to program something like mysterious areas of the level or nature where fog is present (swamps), this tutorial should cover at least some cases. So let's go!
The basic idea behind fog is that the further an object from camera is, the more covered in fog it should be and thus less visible. Because we have now modern GPUs, we can afford to examine every single fragment of the scene how far it is and calculate fog. What we need to get is something called a fogFactor, which is a number ranging from 0.0 to 1.0 and simply says, how much fog should be applied to that fragment. If it's zero, then there's no fog, if 1.0, then the object is covered in fog completely. And anything in between will make the objects to appear / get lost in the fog .
To calculate the fog factor, we also need this distance of the fragment from our position (or our eye). We will refer this as fogCoordinate (c). The minimal distance of the fog coordinate is then the near clipping plane and maximal is far clipping plane. Now we can use three most basic equations how to calculate the fog factor:
Of course, this has been a very quick explanation only, let's go through all the equations now in more detail.
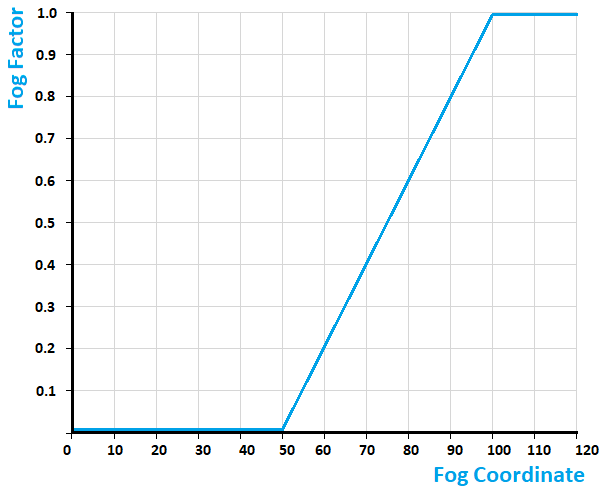
This is really the simplest equation for fog with two additional parameters - linearStart (ls) and linearEnd (le). Anything before linearStart is too close to us and is not yet covered in fog and anything beyond linearEnd is completely covered in fog:

And here is also the graph of the equation, let's take as an example ls=50 and le=100:
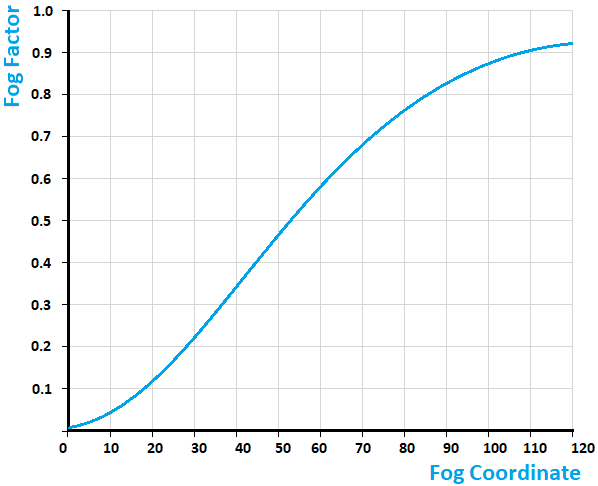
This one is a bit more complex, but also looks a lot better. We don't have any linearStart or linearEnd parameters here, but instead we have a density (d). The equation takes a power of euler number (e) to negative exponent density*fogCoordinate. The result is that fog looks a bit more natural this way - it's more dense closer to us and less dense further from us. This is how we can write the function:

And the graph looks like this:

This one is almost same as exp equation, however the exponent is a bit different - this time the exponent has a square in itself and is negated. The equation looks like this:

And the graph looks like this:
All fog equations mentioned above are implemented in a fog.frag fragment shader. First, let's have a look at it:
#version 440 core

#include_part

struct FogParameters
{
	vec3 color;
	float linearStart;
	float linearEnd;
	float density;

	int equation;
	bool isEnabled;
};

float getFogFactor(FogParameters params, float fogCoordinate);

#definition_part

float getFogFactor(FogParameters params, float fogCoordinate)
{
	float result = 0.0;
	if(params.equation == 0)
	{
		float fogLength = params.linearEnd - params.linearStart;
		result = (params.linearEnd - fogCoordinate) / fogLength;
	}
	else if(params.equation == 1) {
		result = exp(-params.density * fogCoordinate);
	}
	else if(params.equation == 2) {
		result = exp(-pow(params.density * fogCoordinate, 2.0));
	}

	result = 1.0 - clamp(result, 0.0, 1.0);
	return result;
}
As you can see, there is one struct named FogParameters, that contains all the settings we need for our simple fog implementation and one function named getFogFactor. Inside the function, we are differentiating between three equations mentioned above and return the fog factor. This will be used to combine the fragment color with fog color.
In order to call the function getFogFactor, we will need to calculate fog coordinate. This is simply the depth of the fragment in eye-space coordinates. To calculate eye-space position for every fragment, we have to adjust vertex shader a bit. In this tutorial, the shader.vert looks like this:
#version 440 core

uniform struct
{
	mat4 projectionMatrix;
	mat4 viewMatrix;
	mat4 modelMatrix;
	mat3 normalMatrix;
} matrices;

layout(location = 0) in vec3 vertexPosition;
layout(location = 1) in vec2 vertexTexCoord;
layout(location = 2) in vec3 vertexNormal;

smooth out vec2 ioVertexTexCoord;
smooth out vec3 ioVertexNormal;
smooth out vec4 ioEyeSpacePosition;

void main()
{
	mat4 mvMatrix = matrices.viewMatrix * matrices.modelMatrix;
	mat4 mvpMatrix = matrices.projectionMatrix * mvMatrix;
	gl_Position = mvpMatrix * vec4(vertexPosition, 1.0);

	// Output all out variables
	ioVertexTexCoord = vertexTexCoord;
	ioVertexNormal = matrices.normalMatrix * vertexNormal;
	ioEyeSpacePosition = mvMatrix * vec4(vertexPosition, 1.0);
}
What you can observe here is that to calculate the eye-space coordinate, we need to multiply incoming vertex position with a modelview matrix. The variable name is ioEyeSpacePosition. Now we have to make use of it in the fragment shader. Here I'll just show the most important parts of the fragment shader, that combine the fragment with fog:
#version 440 core

// ...

uniform FogParameters fogParams;

void main()
{
    // ...
    outputColor = objectColor*vec4(lightColor, 1.0);

    // Apply fog calculation only if fog is enabled
    if(fogParams.isEnabled)
    {
      float fogCoordinate = abs(ioEyeSpacePosition.z / ioEyeSpacePosition.w);
      outputColor = mix(outputColor, vec4(fogParams.color, 1.0), getFogFactor(fogParams, fogCoordinate));
    }
}
First of all, the fogCoordinate is taken by dividing the Z-coordinate with W-coordinate (to convert from homogeneous coordinates). Then we're calling GLSL function mix, that mixes two input colors using a factor. It multiplies first parameter with 1-a and second parameter with a, that's why the order of parameters is first outputColor and then fogColor. And of course, we will do this operation only if fog is enabled .
Because code for fog calculation is in a dedicated fog.frag, it can be now included anywhere we need (remember, in my classes I have my custom include-other-file support  ). I was thinking if it's not possible to have multiple fragment shaders, so that if you want a fog, you will just apply fog as next fragment shader. But from my (rather short) research, turns out the answer is no. Or that it's not that straightforward. I've read that most engines generate shader code on-the-fly, so that means if you enable / disable fog, they generate a custom source code for that combination of settings and recompile shader program. Another solution is to render with multiple passes off-screen, but that is overcomplicated for now (we'll get to that in the future though ).
One optimization could be made here and that is, if the fog coordinate is 1.0, there is no need to do all the lighting / texture calculations as they won't be used anyway. So if you are interested in a small exercise, adjust the code in a way that optimizes fragment shader by not calculating fragment colors of fragments completely covered by fog (simply apply fog color right away instead of making some fancy calculations and then discarding them anyway).
Here is the fruit of today's effort:
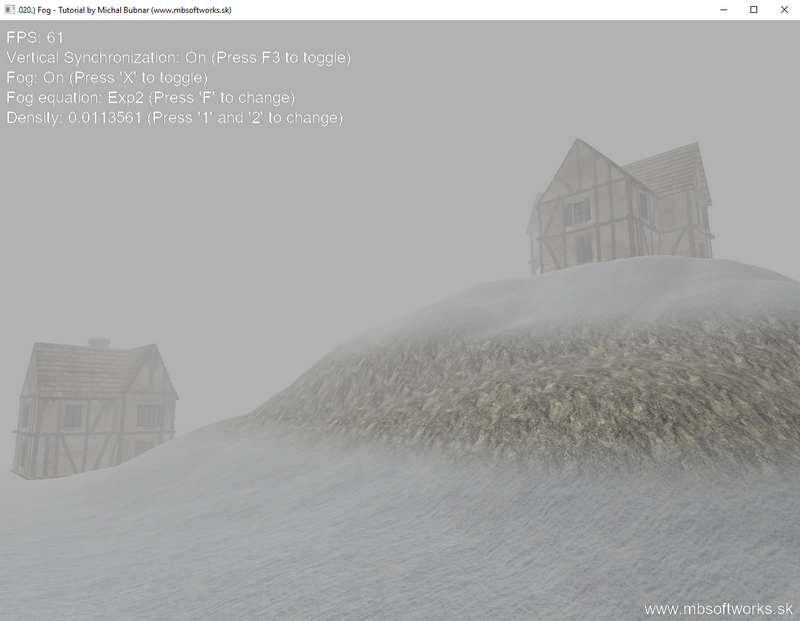
Wow! So now our scenes got a new feeling, this fog looks really nice and is really suitable for games with locations such as some mysterious caves or swamps. So I hope you've enjoyed my humble tutorial again and see you by next tutorial !
 Download 10.95 MB (1190 downloads)