Hello guys and welcome to the 13th tutorial of my OpenGL4 tutorial series! This one is going to be a shorter one and will teach you a thing or two about blending - that is mixing colors. With a good understanding of blending, we can achieve effects like transparent objects, as you may also see in this tutorial. We will also learn about possible pitfalls and how to overcome them. So let's go and learn something new  !
!
Generally spoken, blending is simply mixing of two colors to get another one. Like if you mix same amounts of black and white color, you can get approximately gray color. Simple as that  . When we're speaking about blending in OpenGL, it's the same thing, but there are also some other terms, which I have to explain. In OpenGL, we are not mixing color one and color two to get color three, but we are mixing source color with destination color using source and destination factors. It may sound a bit weird and not so intuitive, but it's actually really simple.
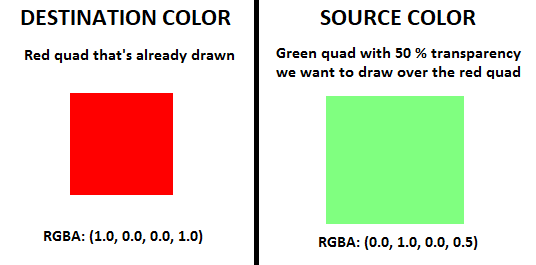
Destination color is simply the color, that is already there - like what you rendered a while before, what is already in the framebuffer. The source color is the color you are about to render. So if I have a red quad already drawn in the scene and I want to draw a green 50% transparent quad over it, the red quad represents destination color (what is already drawn) and green quad represents source color. For a clearer image, have a look at the picture below:

The image should make everything pretty clear, but you might have noticed (and also in the previous tutorial), that we are not using just RGB colors, but RGBA instead. What does this mean? That last component is so called alpha color component, which is normally used to represent transparency - that means if alpha is 0.5, we want the object to be 50% transparent. Buut the thing is, that OpenGL allows you to use this number in many ways, but this one is like the most intuitive - the 0.0 alpha will mean invisible object and 1.0 alpha means completely opaque object  .
.
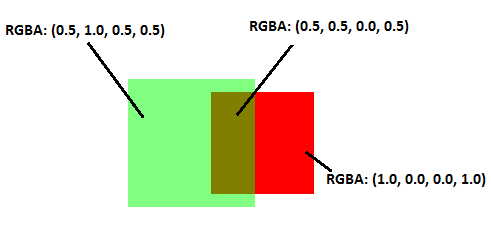
Now back to our example with two quads. To make our quad really look like 50% transparent object, we have to mix the colors properly. In other words, we should achieve effect like this:

How did we achieve this mathematically speaking? As you can see, originally we've had 1.0 as alpha in that red quad (destination color). When we're trying to blend this red quad with the green one, alpha of which is 0.5, that basically means, we have to take 0.5 of the green quad and (1.0-0.5)=0.5 of the red quad. To generalize this, we have to define a way how we mix those two colors. For that purpose, we can define two factors (or multipliers) - one, that we'll multiply destination color with and one, that we'll multiply source color with. Let's call them generally srcFactor for source color and dstFactor for destination color. The equation to calculate final color then looks like this:
sourceColor = [Rsrc , Gsrc , Bsrc , Asrc]
destinationColor = [Rdst , Gdst , Bdst , Adst]
finalColor = [Rfinal , Gfinal , Bfinal , Afinal]
Rfinal = Rsrc * srcFactor + Rdst * dstFactor
Gfinal = Gsrc * srcFactor + Gdst * dstFactor
Bfinal = Bsrc * srcFactor + Bdst * dstFactor
Afinal = Asrc * srcFactor + Rdst * dstFactor
The only thing left is to calculate the two factors. And that's up to us to tell OpenGL, how to calculate those two factors. In my example, the factor for source color is simply the alpha value of the source color (the 50% transparency, or 0.5 in our example) and the destination factor is 1.0 minus the alpha of source color (that is like the complement to the alpha, so that together the sum of those two factors is 1.0).
Let's have a look at the code snippet, how to tell this to OpenGL:
void OpenGLWindow::renderScene()
{
    // ...

    glEnable(GL_BLEND);
	glBlendFunc(GL_SRC_ALPHA, GL_ONE_MINUS_SRC_ALPHA);

    // ...
}
As you can see, the very first step is telling OpenGL, that we want to enable and use blending. The glBlendFunc line tells OpenGL, what factors we want to use with source and destination colors. It requires got two parameters as you might expect - source and destination factor. In our case, we put there GL_SRC_ALPHA for source factor (so basically transparency of our render objects), and GL_ONE_MINUS_SRC_ALPHA for destination factor (then take the complement from destination color). If you put those two factors into our equations above, you will indeed get that orange color, which creates a transparency effect!
By calling glBlendFunc, we are defining a way to calculate factors for all 4 color components (RGBA). OpenGL however provides a way to define this separately for every color component using glBlendFuncSeparate function. I can't think of any use of it now, but I bet there is some cool effect achieved using this function  .
.
Another function for altering blending settings is glBlendEquation. As you can see, in this example we were adding source and destination components together, but what if we wanted to subtract them instead? This is what one may set with this function, among with reverse subtract, taking minimum or taking maximum of values. In our example, calling this function is not necessary, because default blending equation is the addition, and that's what we need. There is a sibling of this function, glBlendEquationSeparate, with which we can define equation for all color components separately.
There is one more important matter, that requires attention in this tutorial and that's depth mask. The thing with rendering transparent objects is a bit more complicated than it looks like. The problem is, that when rendering transparent objects, we don't want to hide objects behind them, in other words, we have to turn writing to the depth buffer off. Moreover, we should first render fully opaque objects first and after that turn the writing to the depth buffer off and render transparent objects. When rendering transparent objects, we don't want to write values to depth buffer, because if there are two transparent objects behind each other, second transparent object behind the first would not pass Z-test after altering the depth buffer values with the first transparent object and thus wouldn't be rendered at all. But because these objects are at least partially transparent, the second object should be visible as well (you can see through two transparent glasses).
To turn writing to the depth buffer on or off, we can use function glDepthMask. It takes one GLboolean parameter - GL_FALSE (or simply number 0) to turn the writing to the depth buffer off or GL_TRUE (or simply number 1) to turn the writing to the depth buffer back on (which is also by default).
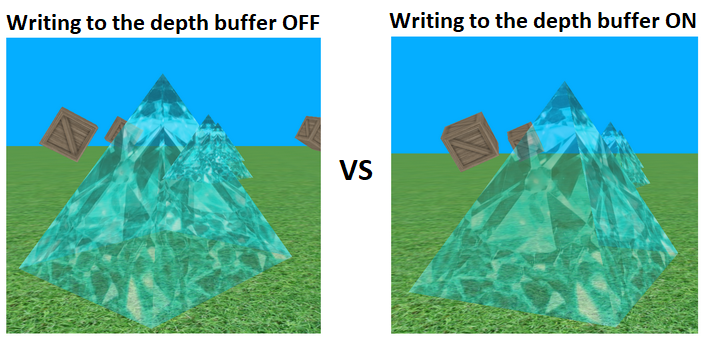
This solution is the simplest one, but it's still not perfect. In my tutorial, you can change turning depth writing on or off using F4 key to see the difference - try to walk with camera close to the pyramids, so you see multiple diamonds pyramids one after another. Without turning writing to the depth buffer off, you can see the pyramids dissapear:

This solution could also be improved not by turning the writing to the depth buffer off, but rather calculating the distance of the transparent objects from the camera and rendering them from the furthest to the closest (depth sorting). There are however even more modern and advanced techniques, which I will cover later, how to overcome this problem. For curious people, the keywords to search for is Order Independent Transparency  .
.
Armed with all the information, let's look at the code, that renders the whole scene:
void OpenGLWindow::renderScene()
{
    // ...

    // Render all the crates (as simple cubes)
	for (const auto& position : cratePositions)
	{
		const auto crateSize = 8.0f;
		auto model = glm::translate(glm::mat4(1.0f), position);
		model = glm::translate(model, glm::vec3(0.0f, crateSize / 2.0f + 3.0f, 0.0f));
		model = glm::rotate(model, rotationAngleRad, glm::vec3(1.0f, 0.0f, 0.0f));
		model = glm::rotate(model, rotationAngleRad, glm::vec3(0.0f, 1.0f, 0.0f));
		model = glm::rotate(model, rotationAngleRad, glm::vec3(0.0f, 0.0f, 1.0f));
		model = glm::scale(model, glm::vec3(crateSize, crateSize, crateSize));
		mainProgram[ShaderConstants::modelMatrix()] = model;

		TextureManager::getInstance().getTexture("crate").bind(0);
		cube->render();
	}

	glEnable(GL_BLEND);
	glBlendFunc(GL_SRC_ALPHA, GL_ONE_MINUS_SRC_ALPHA);

	// Turn also depth mask back off, if it's desired
	if (turnDepthMaskOff) {
		glDepthMask(0);
	}

	// Change the color of diamond pyramids to white with 50% transparency (alpha is 0.5)
	mainProgram[ShaderConstants::color()] = glm::vec4(1.0f, 1.0f, 1.0f, 0.5f);

	// Proceed with rendering diamond pyramids
	for (const auto& position : pyramidPositions)
	{
		const auto pyramidSize = 10.0f;
		auto model = glm::translate(glm::mat4(1.0f), position);
		model = glm::translate(model, glm::vec3(0.0f, pyramidSize / 2.0f, 0.0f));
		model = glm::rotate(model, rotationAngleRad, glm::vec3(0.0f, 1.0f, 0.0f));
		model = glm::scale(model, glm::vec3(pyramidSize, pyramidSize, pyramidSize));

		mainProgram[ShaderConstants::modelMatrix()] = model;

		TextureManager::getInstance().getTexture("diamond").bind(0);
		pyramid->render();
	}

	// Turn depth mask back on, if it has been turned off
	if (turnDepthMaskOff) {
		glDepthMask(1);
	}
	glDisable(GL_BLEND);

    // ...
}
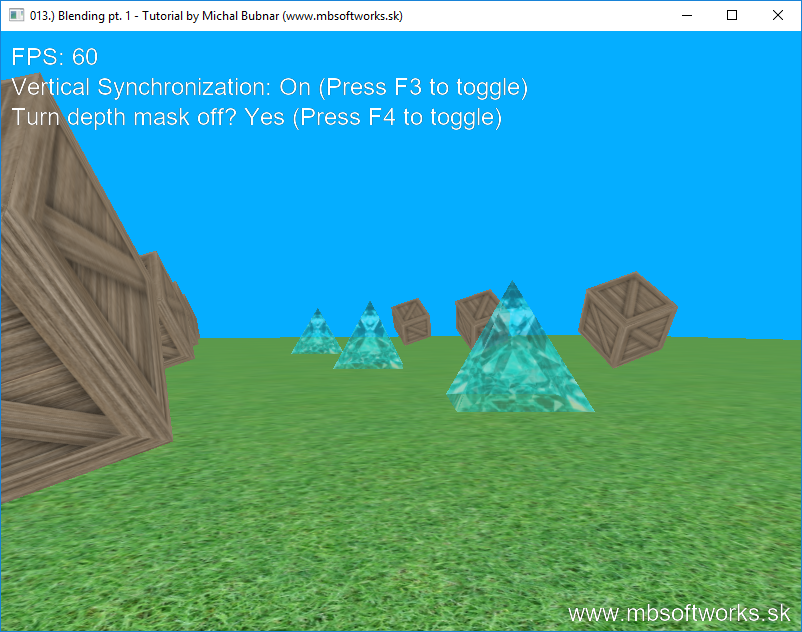
Short summary - first we render opaque objects, in our case rotating crates. Then, we set the color to render with to white, but with 0.5 only as alpha component and we render all the diamond pyramids. There is one bool variable you can control turning writing to the depth buffer off and on (with F4 key), so that you can see the difference for yourself  .
.
I would say that result is really nice, taken that the amount of code to achieve that was rather short:

It is far from perfect, but we could achieve the great effects with a little effort! As I said, I will cover more advanced techniques later, but for the start it's more than enough  . Once again, I hope that you've enjoyed this tutorial and I hope that not much time will pass by before I come with more advanced blending techniques tutorial!
 Download 3.70 MB (996 downloads)