Hello guys and welcome to my 16th tutorial of my OpenGL4 series! In this one, we will do yet another cool thing and that cool thing is we program a heightmap! If you haven't heard of it, well you probably know what terrain is and heightmaps are really suitable for rendering terrain! In this one, we will also learn, how to generate random heightmap, thus generating random terrain! This tutorial is going to be a bit longer and a bit more complicated, so brace yourselves  ! Let's not waste any more time (and words
  ) and let's break the topic down!
First of all, let's answer the very important question - what exactly a heightmap is? The concept is actually not that difficult to understand - heightmap is an array (usually a rectangular 2D array, that simply contains heights of the terrain at particular points. Now the way that you treat those heights is up to you, but I like to use simply numbers from 0.0 to 1.0, with 0.0 being the lowest point in the terrain and 1.0 being the highest point (we could call it normalized heights). And if you define the terrain dimensions, say that my terrain spans from -100 to 100 on X axis, 0 to 20 on Y axis and -200 to 200 on Z axis, you can multiply the numbers in a correct way and get exactly such a terrain!
So let's take a very primitive example and visualize it. Consider a 5x5 2D array with values as following:
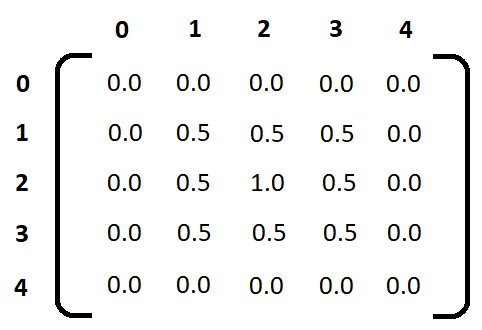
You can see the result directly - the 1.0 in the middle results in the highest point and from this point further the terrain descends down to 0.0, which is the lowest point. The width / height / depth of rendering is chosen by us, it can be whatever value you want, so you can stretch your map arbitrarily! So as you see, the idea is quite easy. Now this tutorial will be basically split into two parts. First part is the algorithm, which can be used to generate random nice looking terrain and second part is the rendering itself  .
.
Let's have a sneak peek at the Heightmap class first:
class Heightmap : public StaticMeshIndexed3D
{
public:
	struct HillAlgorithmParameters
	{
		HillAlgorithmParameters(int rows, int columns, int numHills, int hillRadiusMin, int hillRadiusMax, float hillMinHeight, float hillMaxHeight)
		{
			this->rows = rows;
			this->columns = columns;
			this->numHills = numHills;
			this->hillRadiusMin = hillRadiusMin;
			this->hillRadiusMax = hillRadiusMax;
			this->hillMinHeight = hillMinHeight;
			this->hillMaxHeight = hillMaxHeight;
		}

		int rows;
		int columns;
		int numHills;
		int hillRadiusMin;
		int hillRadiusMax;
		float hillMinHeight;
		float hillMaxHeight;
	};

	Heightmap(const HillAlgorithmParameters& params, bool withPositions = true, bool withTextureCoordinates = true, bool withNormals = true);

	void createFromHeightData(const std::vector>& heightData);

	void render() const override;
	void renderPoints() const override;

	int getRows() const;
	int getColumns() const;
	float getHeight(const int row, const int column) const;

	static std::vector> generateRandomHeightData(const HillAlgorithmParameters& params);

private:
	void setUpVertices();
	void setUpTextureCoordinates();
	void setUpNormals();
	void setUpIndexBuffer();

	std::vector> _heightData;
	std::vector> _vertices;
	std::vector> _textureCoordinates;
	std::vector> _normals;
	int _rows = 0;
	int _columns = 0;
};
What is interesting here is that struct HillAlgorithmParameters. It's just an internal struct used for the random heightmap generation using the hill algorithm. Let's discuss this algorithm now.
The idea is really easy. You start with a flat terrain (all zeros). Then you select a random point on that terrain (random row / column). This will represent the center of your hill. Having center, we now choose random radius of the hill and random height. Now we have all the parameters and we can raise a hill at this place with this radius. Repeat the process several times and you get the nice terrain (just like one in the tutorial)  .
.
As you can see, explaining this with words is no rocket science, we're just raising hills here and there. Now let's transform this logic into the code. The struct mentioned above - HillAlgorithmParameters holds everything that algorithm needs. Let's examine its members:
You can see that we have a variety of parameters, most of which are pretty self explanatory, now let's go through the code, that generates those data. The method is called generateRandomHeightData and it returns 2D array (well, vector of vectors of float actually  ). Let's see its code now:
std::vector> Heightmap::generateRandomHeightData(const HillAlgorithmParameters& params)
{
	std::vector> heightData(params.rows, std::vector(params.columns, 0.0f));

	std::random_device rd;
	std::mt19937 generator(rd());
	std::uniform_int_distribution hillRadiusDistribution(params.hillRadiusMin, params.hillRadiusMax);
	std::uniform_real_distribution hillHeightDistribution(params.hillMinHeight, params.hillMaxHeight);
	std::uniform_int_distribution hillCenterRowIntDistribution(0, params.rows - 1);
	std::uniform_int_distribution hillCenterColIntDistribution(0, params.columns - 1);

	for (int i = 0; i < params.numHills; i++)
	{
		const auto hillCenterRow = hillCenterRowIntDistribution(generator);
		const auto hillCenterCol = hillCenterColIntDistribution(generator);
		const auto hillRadius = hillRadiusDistribution(generator);
		const auto hillHeight = hillHeightDistribution(generator);

		for (auto r = hillCenterRow - hillRadius; r < hillCenterRow + hillRadius; r++)
		{
			for (auto c = hillCenterCol - hillRadius; c < hillCenterCol + hillRadius; c++)
			{
				if (r < 0 || r >= params.rows || c < 0 || c >= params.columns) {
					continue;
				}
				const auto r2 = hillRadius * hillRadius; // r*r term
				const auto x2x1 = hillCenterCol - c; // (x2-x1) term
				const auto y2y1 = hillCenterRow - r; // (y2-y1) term
				const auto height = float(r2 - x2x1 * x2x1 - y2y1 * y2y1);
				if (height < 0.0f) {
					continue;
				}
				const auto factor = height / r2;
				heightData[r][c] += hillHeight * factor;
				if (heightData[r][c] > 1.0f) {
					heightData[r][c] = 1.0f;
				}
			}
		}
	}
	return heightData;
}
At the beginning, there is a bunch of strange looking things - those classes are modern C++ classes to work with random numbers. With them, you can define ranges you want to generate numbers in, be it an integer or floats. Then there is a generator (std::mt19937), that is used to generate numbers within those ranges (mt stands for Mersenne Twister, you can look it up at Mersenne Twister Engine for example) - long story short, it's one of the best possibilities to generate pseudo-random numbers today  .
.
Going further, we can see a bunch of nested loops - as described before, we generate hills at random points several times. The most important part there is the height calculation, which is taken from this equation:

So basically we calculate the height from the center of the hill and then we make sure it's not negative (although it should not happen, but checks like this won't hurt anyway) and we calculate a factor, how far is that number on scale from 0.0 to r2 and we add the random hill height multiplied by this factor. We also make sure however, that we don't exceed 1.0, which is the maximum possible height. This way we keep the heightmap data between 0.0 and 1.0 for sure!
Now that we have random data, let's discuss how shall we render the heightmap, because the process of building it out of data depends on the way of rendering!
Rendering heightmap is a matter of rendering several quads. Every quad is made out of two triangles, so the ideal way is to render heightmap as a bunch of triangle strip. Here is the overview, how the heightmap grid looks like:
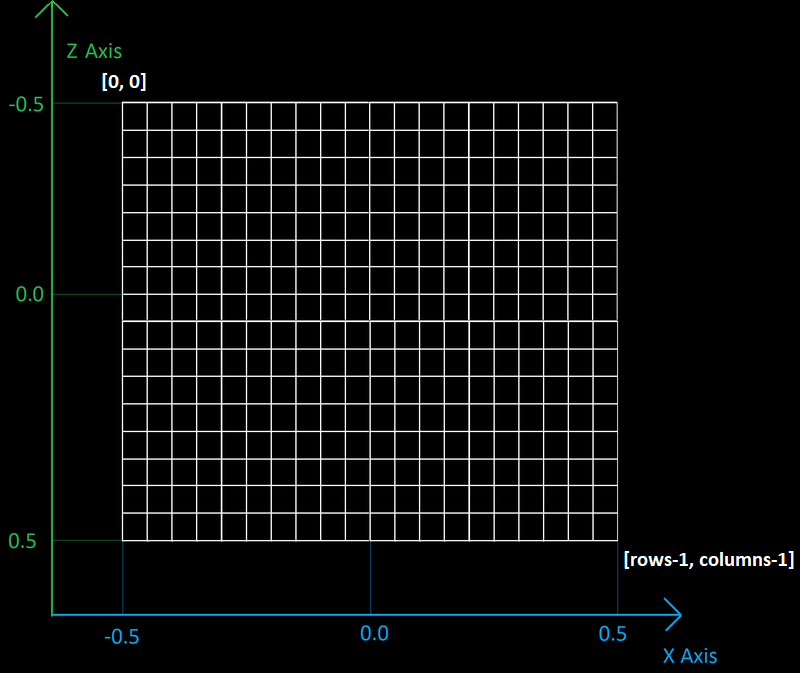
Let's see exactly, how we render it. For every row, we need to do a triangle strip basically. The most efficient way is to use primitive restart index and after every rendered row we restart the primitive, i.e. triangle strip. Following picture should make this concept clear:
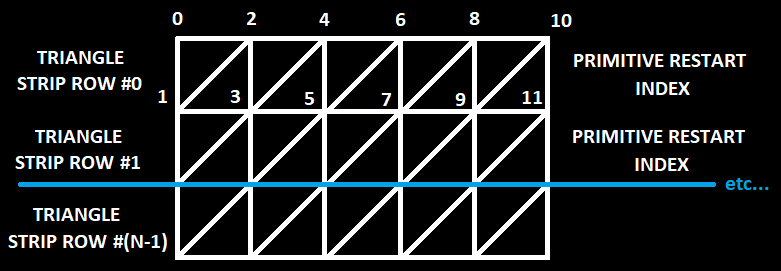
Great, that's relatively simple! Now all we have to do is to generate all vertices, texture coordinates and normals and set up the indices correctly! Let's do it then  .
.
The function that does all of this is called createFromHeightData. It takes pre-generated height data and creates a heightmap out of it:
void Heightmap::createFromHeightData(const std::vector>& heightData)
{
	if (_isInitialized) {
		deleteMesh();
	}

	_heightData = heightData;
	_rows = _heightData.size();
	_columns = _heightData[0].size();
	_numVertices = _rows * _columns;

	// First, prepare VAO and VBO for vertex data
	glGenVertexArrays(1, &_vao);
	glBindVertexArray(_vao);
	_vbo.createVBO(_numVertices*getVertexByteSize()); // Preallocate memory
	_vbo.bindVBO();

	if (hasPositions()) {
		setUpVertices();
	}

	if (hasTextureCoordinates()) {
		setUpTextureCoordinates();
	}

	if (hasNormals())
  {
		if (!hasPositions()) {
			setUpVertices();
		}

		setUpNormals();
	}

	setUpIndexBuffer();

	// Clear the data, we won't need it anymore
	_vertices.clear();
	_textureCoordinates.clear();
	_normals.clear();

	// If get here, we have succeeded with generating heightmap
	_isInitialized = true;
}
In general, we can split this method into four main steps - setting up vertices, setting up texture coordinates, setting up normals and setting the indexed rendering. To fully understand, we will have to go through all of these steps.
void Heightmap::setUpVertices()
{
	_vertices = std::vector>(_rows, std::vector(_columns));

	for (auto i = 0; i < _rows; i++)
	{
		for (auto j = 0; j < _columns; j++)
		{
			const auto factorRow = float(i) / float(_rows - 1);
			const auto factorColumn = float(j) / float(_columns - 1);
			const auto& vertexHeight = _heightData[i][j];
			_vertices[i][j] = glm::vec3(-0.5f + factorColumn, vertexHeight, -0.5f + factorRow);
		}
		_vbo.addData(_vertices[i].data(), _columns*sizeof(glm::vec3));
	}
}
This one is relatively easy! We are just generating a grid of points, that are uniformly distributed and their coordinates are ranging from -0.5 to 0.5 on X and Z axis and from 0.0 to 1.0 at height. Basically we have a super small heightmap this way, but afterwards we can scale it up to fit our needs!
void Heightmap::setUpTextureCoordinates()
{
	_textureCoordinates = std::vector>(_rows, std::vector(_columns));

	const auto textureStepU = 0.1f;
	const auto textureStepV = 0.1f;

	for (auto i = 0; i < _rows; i++)
	{
		for (auto j = 0; j < _columns; j++) {
			_textureCoordinates[i][j] = glm::vec2(textureStepU * j, textureStepV * i);
		}
		_vbo.addData(_textureCoordinates[i].data(), _columns * sizeof(glm::vec2));
	}
}
Still pretty easy, it's just a linear equation, and we basically repeat texture once for every 10 rows / columns. This is kind of questionable approach, for now it serves me well, but it's really easy and up to you to just map texture onto the terrain as many times as you consider it necessary (I really wanted to keep it simple now  ).
).
void Heightmap::setUpNormals()
{
	_normals = std::vector>(_rows, std::vector(_columns));
	std::vector< std::vector > tempNormals[2];
	for (auto i = 0; i < 2; i++) {
		tempNormals[i] = std::vector>(_rows-1, std::vector(_columns-1));
	}

	for (auto i = 0; i < _rows - 1; i++)
	{
		for (auto j = 0; j < _columns - 1; j++)
		{
			const auto& vertexA = _vertices[i][j];
			const auto& vertexB = _vertices[i][j+1];
			const auto& vertexC = _vertices[i+1][j+1];
			const auto& vertexD = _vertices[i+1][j];

			const auto triangleNormalA = glm::cross(vertexB - vertexA, vertexA - vertexD);
			const auto triangleNormalB = glm::cross(vertexD - vertexC, vertexC - vertexB);

			tempNormals[0][i][j] = glm::normalize(triangleNormalA);
			tempNormals[1][i][j] = glm::normalize(triangleNormalB);
		}
	}

	for (auto i = 0; i < _rows; i++)
	{
		for (auto j = 0; j < _columns; j++)
		{
			const auto isFirstRow = i == 0;
			const auto isFirstColumn = j == 0;
			const auto isLastRow = i == _rows - 1;
			const auto isLastColumn = j == _columns - 1;

			auto finalVertexNormal = glm::vec3(0.0f, 0.0f, 0.0f);

			// Look for triangle to the upper-left
			if (!isFirstRow && !isFirstColumn) {
				finalVertexNormal += tempNormals[0][i-1][j-1];
			}

			// Look for triangles to the upper-right
			if (!isFirstRow && !isLastColumn) {
				for (auto k = 0; k < 2; k++) {
					finalVertexNormal += tempNormals[k][i - 1][j];
				}
			}

			// Look for triangle to the bottom-right
			if (!isLastRow && !isLastColumn) {
				finalVertexNormal += tempNormals[0][i][j];
			}

			// Look for triangles to the bottom-right
			if (!isLastRow && !isFirstColumn) {
				for (auto k = 0; k < 2; k++) {
					finalVertexNormal += tempNormals[k][i][j-1];
				}
			}

			// Store final normal of j-th vertex in i-th row
			_normals[i][j] = glm::normalize(finalVertexNormal);
		}
		_vbo.addData(_normals[i].data(), _columns * sizeof(glm::vec3));
	}
}
Well now it gets more difficult. The way I calculate the vertex normals is that I take all the triangles, that surround my vertex and I sum them all and take the average. And the part of taking surrounding triangles is the most difficult one. First of all, I am calculating the normals of every triangle and I store them in a variable called tempNormals. This is quite an easy task, there are (rows-1)*(columns-1) quads that create a heightmap, each of which is consisting of two triangles. Let's have a look at one quad:
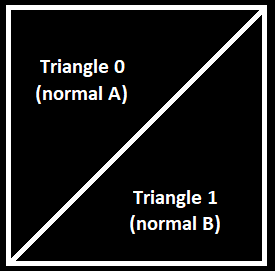
In the code, the normals are calculated and stored in variables triangleNormalA and triangleNormalB. These variables go to a temporary vector of normals tempNormals. Now that we have the normals of every single triangle, for each vertex of the heightmap we have to consider four surroundings:
Following picture should make this clear (look at the triangles, that surround any vertex):
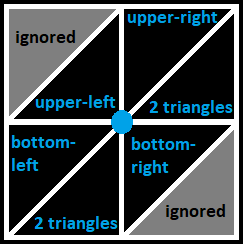
After summing normals from all surrounding triangles, we just normalize the resulting normal and that's it!
void Heightmap::setUpIndexBufer()
{
	// Create a VBO with heightmap indices
	_indicesVBO.createVBO();
	_indicesVBO.bindVBO(GL_ELEMENT_ARRAY_BUFFER);
	_primitiveRestartIndex = _numVertices;

	for (auto i = 0; i < _rows - 1; i++)
	{
		for (auto j = 0; j < _columns; j++)
		{
			for (auto k = 0; k < 2; k++)
			{
				const auto row = i + k;
				const auto index = row * _columns + j;
				_indicesVBO.addData(&index, sizeof(int));
			}
		}
		// Restart triangle strips
		_indicesVBO.addData(&_primitiveRestartIndex, sizeof(int));
	}

	// Send indices to GPU
	_indicesVBO.uploadDataToGPU(GL_STATIC_DRAW);

	// Calculate total count of indices
	_numIndices = (_rows - 1)*_columns * 2 + _rows - 1;
}
The last step is to set up the indices to render heightmap. There is nothing overly complicated there, we just have to set primitive restart index, which is number of vertices, just like in case of torus and then set vertices up the same way as it has been depicted above in how to render a single row of heightmap. That is, in every row we add vertices one by one and finalize the row with primitive restart index  .
.
Rendering heightmap is now a matter of calling just a few OpenGL functions:
void Heightmap::render() const
{
	if (!_isInitialized) {
		return;
	}

	glBindVertexArray(_vao);
	glEnable(GL_PRIMITIVE_RESTART);
	glPrimitiveRestartIndex(_primitiveRestartIndex);

	glDrawElements(GL_TRIANGLE_STRIP, _numIndices, GL_UNSIGNED_INT, 0);
	glDisable(GL_PRIMITIVE_RESTART);
}
And in the renderScene() function, all we have to do is to scale our heightmap to fit our needs (I've created a variable heightMapSize for that) and call the render method:
void OpenGLWindow::renderScene()
{
    // ...

	const auto heightmapModelMatrix = glm::scale(glm::mat4(1.0f), heightMapSize);
	mainProgram.setModelAndNormalMatrix(heightmapModelMatrix);
	TextureManager::getInstance().getTexture("clay").bind(0);
	heightmap->render();

    // ...
}This is what has been achieved today:

Don't forget to play with the heightmap! Press 'R' to generate randomly again, so that you can see that it works! The objects in the scene are offset by the height of heightmap at that particular place too (look in the code how it's done). I hope that you've enjoyed this tutorial once more and although it too me a bit longer to write it (I was two weeks on a vacation in Dominican Republic, really cool place gotta say  ), I hope it was worth waiting. Thank you if you've read it this far and stay tuned for the next tutorials!
 Download 3.23 MB (1509 downloads)