
C++, OpenGL and more...
 Megabyte Softworks Facebook
 Megabyte Softworks Patreon
Hi guys! Time is passing so fast and I try to bring new tutorials and articles regularly, however this one took me very long because I'm undergoing big life changes. Apart from my newborn son, we are also in the middle of moving from the capital of Slovakia to my hometown Vranov nad Topľou, which is on the exact opposite side of Slovakia  . This all consumes lots of my time and even if I have some free time left, I'm glad I can rest for a second.
But finally I managed to finish this really long article and today it's about framebuffer - you will learn what is framebuffer and renderbuffer, the basics of off-screen rendering and much more! This tutorial opens door to the new world of cool features, so let's dig in right away!
Rendering is a pretty complex process. You need to render polygons, generate some new geometry, process the vertices through series of matrices, apply shading on the individual pixels and then you see something on the screen. To do this correctly, several buffers help us, like depth buffer, stencil buffer or even color buffer, which is simply a buffer that holds all the pixels and their final colors. I guess this all is clear to you, but I had to make a quick recap  .
.
All those sub-buffers like color buffer or depth buffer are called renderbuffers. All those different renderbuffers are packed together within a framebuffer. So it's simple as that! Framebuffer is a collection of several renderbuffers! Nevertheless a picture is always more expressing:
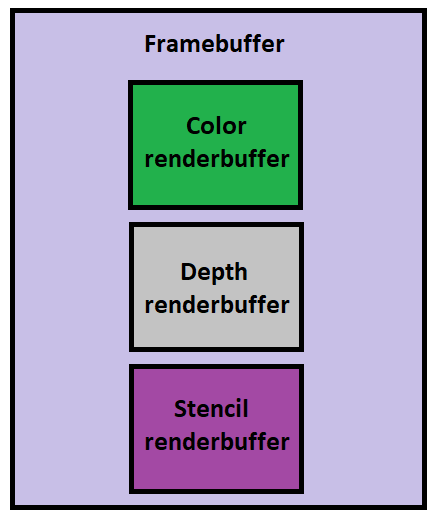
Of course, you don't have to use all the renderbuffers depicted here if you don't want to. When OpenGL is initialized, you get a default framebuffer which usually consists of a color buffer and depth buffer (which usually uses 24 bits for depth and leftover 8 bits are used for stencil buffer, more to default framebuffer comes later in the article). All of this is fully configurable and you can select this during creation of OpenGL context .
Apart from the default framebuffer, you might create your custom framebuffers. If you create a custom framebuffer and you render something to it, you won't see this on a screen immediately, because what you see is always a default framebuffer. That's why this process is called off-screen rendering, because you render something that you don't see on the screen . And why would you do that you might ask? There are millions of reasons and usages for that really, one of which is going to be demonstrated in this tutorial. We will implement the 3D object picking using off-screen color buffer . But before we get to that and all the details, let's have a look at two classes I have written - RenderBuffer and FrameBuffer.
Here are the contents of the class:
class RenderBuffer
{
public:
    ~RenderBuffer();

    bool create(GLenum internalFormat, GLsizei width, GLsizei height);
    bool resize(GLsizei newWidth, GLsizei newHeight);

    GLuint getID() const;
    GLenum getInternalFormat() const;
    GLsizei getWidth() const;
    GLsizei getHeight() const;
    GLint getDepthBits();
    GLint getStencilBits();

    void deleteRenderBuffer();

private:
    GLuint renderBufferID_{ 0 }; // ID of the renderbuffer generated by OpenGL
    GLenum internalFormat_{ 0 }; // Internal format selected during creation
    GLsizei width_{ 0 }; // Width of the renderbuffer
    GLsizei height_{ 0 }; // Height of the renderbuffer

    GLint depthBits_{ -1 }; // Cached number of bits for depth
    GLint stencilBits_{ -1 }; // Cached number of bits for stencil
};
As you can see, the class provides lots of methods, most of which are getters. But let's go through the most important ones - create and resize. Let's start with the create method:
bool RenderBuffer::create(GLenum internalFormat, GLsizei width, GLsizei height)
{
    glGenRenderbuffers(1, &renderBufferID_);
    if(renderBufferID_ == 0)
    {
        std::cerr << "Unable to create renderbuffer with internal format " << internalFormat
            << " and dimensions [" << width << ", " << height << "]!" << std::endl;
        return false;
    }

    std::cout << "Created renderbuffer with ID #" << renderBufferID_ << std::endl;

    // Bind newly created renderbuffer and set its storage attributes
    glBindRenderbuffer(GL_RENDERBUFFER, renderBufferID_);
    glRenderbufferStorage(GL_RENDERBUFFER, internalFormat, width, height);

    // Cache the attributes as member variables
    internalFormat_ = internalFormat;
    width_ = width;
    height_ = height;

    return true;
}
What do we do here? As first thing, we call the glGenRenderbuffers to generate new renderbuffer object and get an ID from OpenGL. Should it fail, an error is logged and the function ends prematurely. Normally we continue further and we have to bind the renderbuffer to continue working with it. This is done with the glBindRenderbuffer function. Finally we setup the renderbuffer with a specified format and size (width and height) using the glRenderbufferStorage. Most common internal formats that we'll use in our tutorials will be:
Upon successful initialization, we cache the settings to member variables. This is important not only to keep the class in a good state, but also for the next method resize. You might ask why even bother with resizing the renderbuffer? One common case that is implemented in this tutorial as well is when the window gets resized and then the original renderbuffer size doesn't correspond to the window size anymore. Here is the implementation:
bool RenderBuffer::resize(GLsizei newWidth, GLsizei newHeight)
{
    // If the renderbuffer has not been created yet, we can't even resize it
    if(renderBufferID_ == 0) {
        return false;
    }

    // Just remember the internal format, delete and recreate the buffer with new width and height
    const auto internalFormat = internalFormat_;
    deleteRenderBuffer();
    return create(internalFormat, newWidth, newHeight);
}
It's nothing else than destroying the renderbuffer completely and creating new one with new settings . Other renderbuffer methods are relatively simple, I encourage you to have a look at them yourself.
Here are the contents of the class:
class FrameBuffer
{
public:
    ~FrameBuffer();

    bool createFrameBufferWithColorAndDepthWithDefaultScreenSize();
    bool createFrameBufferWithColorAndDepth(GLsizei width, GLsizei height);

    void bindAsBothReadAndDraw() const;
    void bindAsRead() const;
    void bindAsDraw() const;

    bool resize(GLsizei newWidth, GLsizei newHeight);

    void setFullViewport() const;

    void copyColorToDefaultFrameBuffer() const;
    void copyDepthFromDefaultFrameBuffer() const;

    GLsizei getWidth() const;
    GLsizei getHeight() const;
    GLint getDepthBits();
    GLint getStencilBits();

    static std::vector readColorValue(int x, int y);

    void deleteFrameBuffer();

    class Default
    {
    public:
        static void bindAsBothReadAndDraw();
        static void bindAsRead();
        static void bindAsDraw();

        static GLint getDepthBits();
        static GLint getStencilBits();
        static void setFullViewport();
    };

private:
    GLuint frameBufferID_{ 0 }; // ID of the framebuffer generated by OpenGL
    std::unique_ptr colorRenderBuffer_; // Here we hold color renderbuffer
    std::unique_ptr depthRenderBuffer_; // Here we hold depth renderbuffer

    GLsizei width_{ 0 }; // Width of the framebuffer in pixels
    GLsizei height_{ 0 }; // Height of the framebuffer in pixels
    GLint depthBits_{ -1 }; // Cached number of bits for depth
    GLint stencilBits_{ -1 }; // Cached number of bits for stencil

    void deleteOnlyFrameBuffer();
};
Again, there are plenty of functions here, I will briefly go through all of them, but the most important one is createFrameBufferWithColorAndDepth. This one creates framebuffer with color and depth, the two most important parts that we usually need. Let's examine it:
bool FrameBuffer::createFrameBufferWithColorAndDepth(const GLsizei width, const GLsizei height)
{
    if (frameBufferID_ != 0) {
        return false;
    }

    // First create and bind framebuffer object (FBO)
    glGenFramebuffers(1, &frameBufferID_);
    if(frameBufferID_ == 0)
    {
        std::cerr << "Unable to create framebuffer!" << std::endl;
        return false;
    }

    glBindFramebuffer(GL_FRAMEBUFFER, frameBufferID_);
    std::cout << "Created framebuffer with ID #" << frameBufferID_ << ", its dimensions will be [" << width << ", " << height << "]" << std::endl;

    // Create color render buffer and attach it to FBO
    auto colorRenderBuffer = std::make_unique();
    if(!colorRenderBuffer->create(GL_RGBA8, width, height))
    {
        std::cerr << "Unable to create color attachment for the framebuffer #" << frameBufferID_ << "!" << std::endl;
        deleteFrameBuffer();
        return false;
    }

    glFramebufferRenderbuffer(GL_FRAMEBUFFER, GL_COLOR_ATTACHMENT0, GL_RENDERBUFFER, colorRenderBuffer->getID());

    // Create depth buffer and attach it to FBO
    auto depthRenderBuffer = std::make_unique();
    if(!depthRenderBuffer->create(GL_DEPTH_COMPONENT24, width, height))
    {
        std::cerr << "Unable to create depth attachment for the framebuffer #" << frameBufferID_ << "!" << std::endl;
        deleteFrameBuffer();
        return false;
    }

    glFramebufferRenderbuffer(GL_FRAMEBUFFER, GL_DEPTH_ATTACHMENT, GL_RENDERBUFFER, depthRenderBuffer->getID());

    // Check FBO status when all attachments have been attached
    const auto fboStatus = glCheckFramebufferStatus(GL_FRAMEBUFFER);
    if(fboStatus != GL_FRAMEBUFFER_COMPLETE) {
        return false;
    }

    // When everything went well, cache attributes into member variables
    colorRenderBuffer_ = std::move(colorRenderBuffer);
    depthRenderBuffer_ = std::move(depthRenderBuffer);
    width_ = width;
    height_ = height;

    return true;
}
We start off by creating a framebuffer object with glGenFramebuffers. If it doesn't succeed, we don't even continue. Then, we create the color renderbuffer as a unique pointer (I'll get later to why do I do it like this). The next step is mega important - we attach the renderbuffer to the framebuffer by calling glFramebufferRenderbuffer. We attach color here, so we use GL_COLOR_ATTACHMENT0. Second part is creating the depth renderbuffer - we'll create it the same way as a unique pointer and then attach it to the framebuffer, this time with GL_DEPTH_ATTACHMENT.
Next few actions are very important - first, we just perform a check for the framebuffer completeness (I understand it as if the framebuffer is like ready to be used now). Because we have attached color and depth renderbuffers, it should be ready, but let's make sure. If we pass this test, we are done and we move the created renderbuffer unique pointers to the member variables .
And now why did I do it with unique pointers? Because if something goes wrong along the way, those smart pointers make sure to destroy themselves, so all the resources are freed in that case! But if everything goes well, we move the smart pointers to the member variables and thus we keep them . It's a nice trick how to do the aic resource management.
This class contains several more methods which I will quickly go through, but before I do so, we have to cover what is read and draw framebuffer. Because we can have multiple framebuffers now, we need to define which framebuffer we read from and which framebuffer we draw to. For example, if we want to copy pixels from one framebuffer to another using OpenGL methods, we always copy from read framebuffer to draw framebuffer. At the beginning (by default), read and draw framebuffer is the default framebuffer - one that is created together with window. The default framebuffer has OpenGL ID 0. Default framebuffer can be manipulated with too, I have written several methods for that purpose. And as usual in OpenGL, to tell that we work with a particular framebuffer, we say that we bind framebuffer as read, as draw, or as both .
Now let's go through the other framebuffer methods:
There are some other getter and internal methods, but I leave this for the self-study of the reader  . The FrameBuffer class also contains subclass Default, that contains bunch of static methods to work with the default framebuffer:
Regarding implementation of all the methods for working with default framebuffer, I leave it again for the reader to have a look at . It's nothing difficult, just some OpenGL queries and methods we use for quite some time .
Now that we know what framebuffers and renderbuffers are and we know a bit what do my classes offer, it's time to talk about the 3D color picking algorithm. How does it work? Idea is very simple - every object that we want to pick is going to be rendered with a different color. Then, when user clicks on anything, we read out the color value under the mouse cursor and because we know what objects were rendered with what color, we also know if we clicked on an object or not!
Of course, this all happens off-screen - we don't want user to see our supplementary framebuffer, that renders the world in a simple color mode used for 3D picking. We just do it behind the scenes and not only that - we only do it when a mouse click happens! So no unnecessary off-screen renderings, that would probably lower our FPS, but really only if it's necessary! I think this approach is as good as it gets .
The question is now what colors to use to represent our objects with. Of course, we could render objects with visually very different colors like red, green, blue, orange, violet etc. But we as humans don't really need to see visual difference between the objects. Therefore we can instead render first object with RGB color (0, 0, 0), second object with (0, 0, 1), third with (0, 0, 2) etc. We won't see much of a color difference with human eye, but computer knows it's a different value and that's enough . And if we gather all pickable objects in one std::vector, we can simply get such color from the object's index (so object #0 has color (0, 0, 0), object #1 has color (0, 0, 1) etc.).
How to pick a color under the mouse cursor? Fortunately, OpenGL has an answer and it provides a function called glReadPixels. This function is a very simple one - it takes [X, Y] coordinates on the screen to start at and then reads [width, height] rectangular region and desired attribute (in our case the color) and stores it where you tell it to. Because we just need color under mouse cursor, the [X, Y] position is the cursor position and rectangle's width and height are [1, 1] .
Now that we have the color under the cursor, we can convert the RGB to object index again! To do this, we simply reconstruct it by combining R color component as least-significant byte, G component as second byte and B component as third byte. And voila - the index is back!
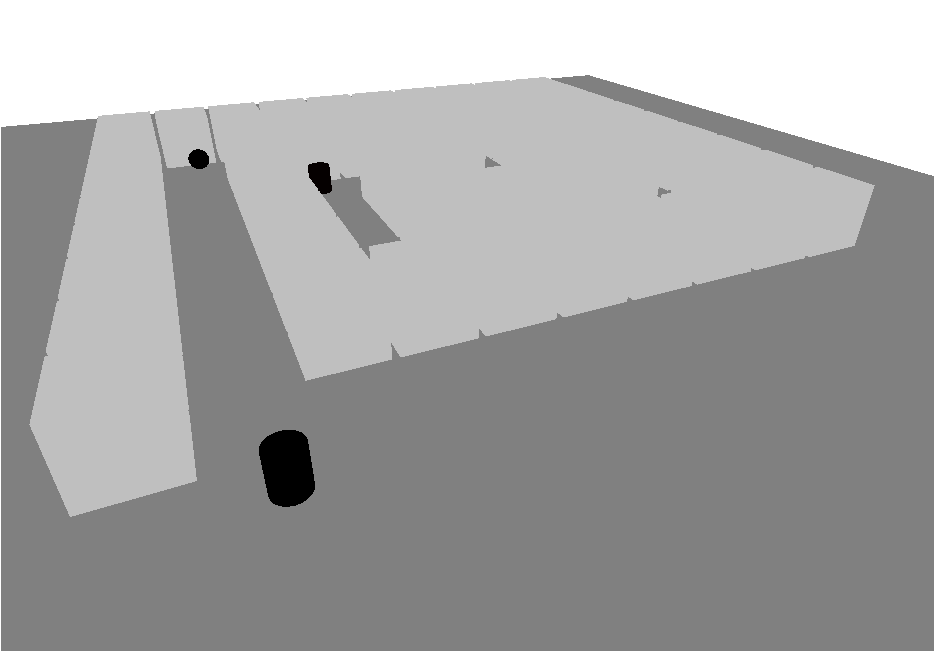
I just made one small trick to visualize this buffer. Normally, one could just have the black buffer initially (filled with RGB 0, 0, 0) and then all the indices would be encoded from (0, 0, 1). This means that if we would read out (0, 0, 0), we have clicked on nothing, otherwise it's a pickable object. In my case, I fill buffer with white background color (RGB 255, 255, 255) and then I encode all the indices starting from (0, 0, 0). Non-pickable world objects, such as ground, are rendered with shades of gray (not to confuse with Fifty Shades of Grey ).
If I read out the index and it's greater or equal to the number of pickable objects that I have, this must mean I have clicked on nothing (because gray or white color has a high RGB value and for sure we don't have millions of objects to pick). And when we visualize the buffer, the pickable objects are clearly black, non-pickable parts of the world are grayish and the background is white. Just look at the picture of the visualized buffer:
Whichever approach you choose, make sure you can easily convert between the index and color and vice versa .
Color picking is implemented with the ObjectPicker class. I won't go through the whole class, I will just pinpoint two of the most important functions, first one - renderInColorMode - follows:
void ObjectPicker::renderInColorMode()
{
    const auto& mm = MatrixManager::getInstance();

    auto& singleColorShaderProgram = ShaderProgramManager::getInstance().getShaderProgram("single-color");
    singleColorShaderProgram.useProgram();
    singleColorShaderProgram[ShaderConstants::projectionMatrix()] = mm.getProjectionMatrix();
    singleColorShaderProgram[ShaderConstants::viewMatrix()] = mm.getViewMatrix();

    singleColorShaderProgram[ShaderConstants::color()] = glm::vec4(0.5f, 0.5f, 0.5f, 1.0f);
    World::getInstance().renderGround(singleColorShaderProgram);
    singleColorShaderProgram[ShaderConstants::color()] = glm::vec4(0.75f, 0.75f, 0.75f, 1.0f);
    World::getInstance().renderCratesMaze(singleColorShaderProgram);

    for (auto i = 0; i < static_cast(objects_.size()); i++)
    {
        const auto& object = objects_.at(i);

        const auto r = i & 0xFF;
        const auto g = (i >> 8) & 0xFF;
        const auto b = (i >> 16) & 0xFF;
        const auto fr = static_cast(r) / 255.0f;
        const auto fg = static_cast(g) / 255.0f;
        const auto fb = static_cast(b) / 255.0f;
        singleColorShaderProgram[ShaderConstants::color()] = glm::vec4(fr, fg, fb, 1.0f);

        auto modelMatrix = glm::translate(glm::mat4(1.0f), object.position);
        modelMatrix = glm::rotate(modelMatrix, object.rotationAngleRad, glm::vec3(0.0f, 1.0f, 0.0f));
        modelMatrix = glm::scale(modelMatrix, object.getRenderScale());
        if (!pixelPerfectSelectionMode_)
        {
            modelMatrix = glm::scale(modelMatrix, object.occlusionBoxSize);
            singleColorShaderProgram[ShaderConstants::modelMatrix()] = modelMatrix;
            occluderCube_->render();
        }
        else
        {
            singleColorShaderProgram[ShaderConstants::modelMatrix()] = modelMatrix;
            object.meshPtr->render();
        }
    }
}
To recap what this function does - first, the world is rendered with two different grayscale colors (3x0.5f and 3x0.75f). These colors are high enough to translate to index far far greater than the number of objects we have. Then, we iterate through all the pickable objects and we calculate the color to render them with based on object index. On top of that, I made one mini feature - we can perform selection in pixel perfect mode, this means we render off-screen the original object with the same level of detail (LOD) and if we don't do pixel-perfect selection mode, then we render occlusion cube instead - less precise, but should be a lot faster . Just play around with all the controls and you will see the visualized buffer.
One note here - you can see that I render the world prior to rendering the pickable objects. This wasn't my original idea, my original idea was to copy depth buffer contents from the default framebuffer instead, so that no rendering of the world has to be done again. To my surprise, this hasn't worked somehow and I was getting visual depth buffer artifacts and the picking wasn't working properly. I actually spent hours trying to fix this and I was desperate after countless attempts and different ways of calling the functions. Eventually I gave up and I fell back to this simple solution - just render the world again. If anyone has an idea why, please let me know.
Second one - performObjectPicking follows:
void ObjectPicker::performObjectPicking(int x, int y)
{
    pickingFrameBuffer_.bindAsBothReadAndDraw();
    pickingFrameBuffer_.setFullViewport();

    glClearColor(1.0f, 1.0f, 1.0f, 1.0f);
    glClear(GL_COLOR_BUFFER_BIT | GL_DEPTH_BUFFER_BIT);

    renderInColorMode();

    const auto colorValues = FrameBuffer::readColorValue(x, y);
    const auto r = static_cast(colorValues[0]);
    const auto g = static_cast(colorValues[1]);
    const auto b = static_cast(colorValues[2]);
    selectedIndex_ = r | (g << 8) | (b << 16);
}
This method is called on demand only, for example when we click with a mouse button. It renders the scene in the color mode, reads out the pixel value under given position [x, y] and then converts the color back to the index. If we click on the dark color, which represents selected object, we get a real index of an object. Should we click on non-pickable point like walls or ground, we should get index that's way too beyond number of our pickable objects (because the color is lighter) .
Last thing to cover in this tutorial is how can we copy contents between framebuffers. The key ingredient is the glBlitFramebuffer. This method copies any attachment from the read framebuffer to the draw framebuffer. You can copy color, depth, stencil, whatever you want (but as I mentioned, I ran into strange artifacts when copying depth and this remains an unsolved problem for me). Have a look at the method specification, but basically you specify source region in the read framebuffer and target region in the draw framebuffer and you copy that part. You can also define the filtering mode, in case source and target region don't have same size (I simply chose GL_NEAREST).
This method is also used to visualize the color framebuffer - I just copy color attachment from my off-screen supplementary buffer to the default framebuffer. The code follows:
void FrameBuffer::copyColorToDefaultFrameBuffer() const
{
    const auto screenWidth = OpenGLWindow::getDefaultWindow()->getScreenWidth();
    const auto screenHeight = OpenGLWindow::getDefaultWindow()->getScreenHeight();

    bindAsRead();
    Default::bindAsDraw();
    glBlitFramebuffer(0, 0, width_, height_, 0, 0, screenWidth, screenHeight, GL_COLOR_BUFFER_BIT, GL_NEAREST);
}This is what has been achieved within this tutorial:
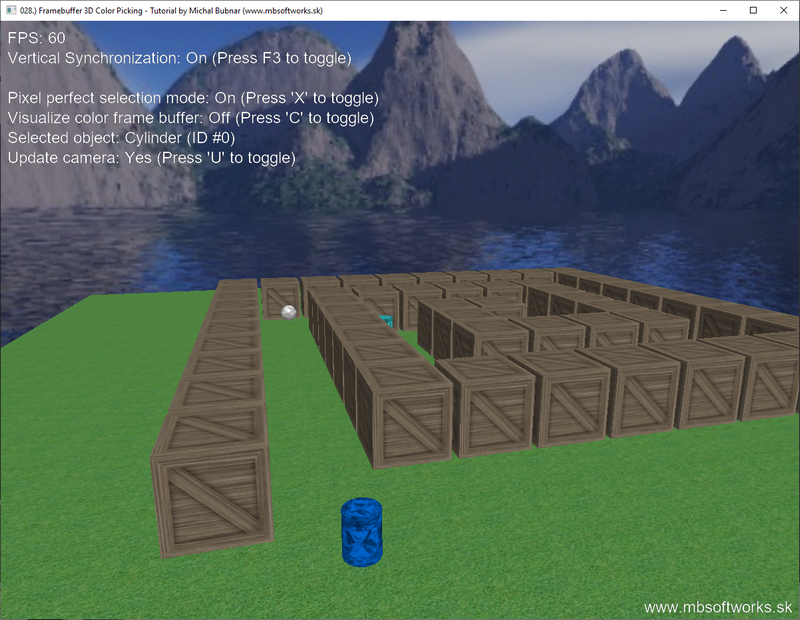
Cool right? Now we can click around the world and select objects! If you implement a computer game, you sure will need some functionality like this (to click on an object and pick it up for example). Framebuffers open door to the world of new possibilities and cool stuff that can be implemented and although this is just a first framebuffer-based tutorial, several more will come in the future, that's for sure .
 Download 4.26 MB (615 downloads)