
C++, OpenGL and more...
 Megabyte Softworks Facebook
 Megabyte Softworks Patreon
Welcome to the 29th tutorial of my OpenGL4 series! In this one, we extend framebuffer with a possibility to render to the texture directly, which can then be applied onto surfaces! Took me a bit longer to write, because in the last weeks I was settling down at my new and old home (my hometown Vranov nad Toplou I moved back from Bratislava to live here  ) and also I spend a lot of time with my 6 months old son a lot lately, so even less time for writing than usual. But now the article is here so enjoy
  .
.
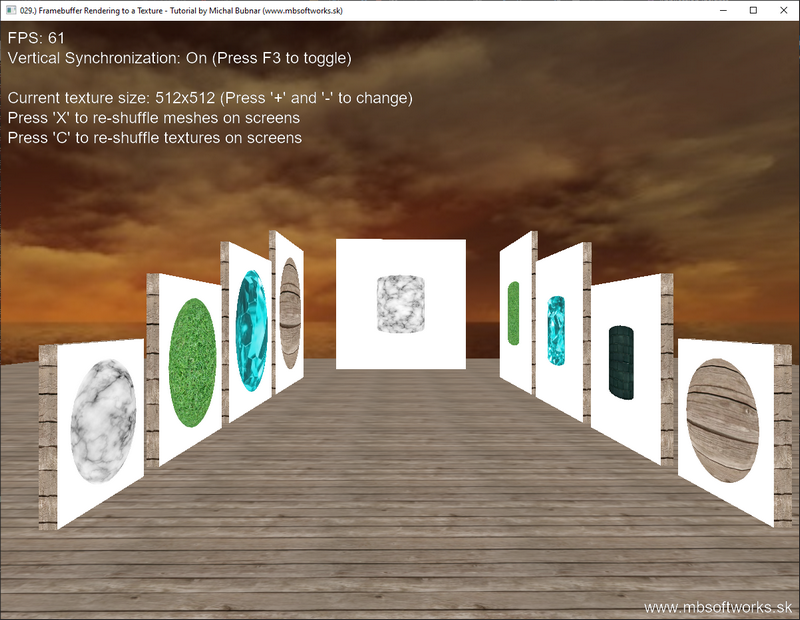
What exactly is rendering to a texture? It's a very simple thing - just like last time we were doing off-screen rendering to perform 3D object picking, this time we do the off-screen rendering for other purpose - the final image of the framebuffer will be used as a texture and mapped onto the surfaces! It's that simple really! And in this tutorial, we will create a "gallery" that contains pictures with primitives . But maybe some other usages that come to my mind is implementing a control panel in some game, that shows footage of some security cameras in other rooms - that's where this would fit perfectly .
Because the framebuffer class is getting a bit too complex now and creation of framebuffer is complex as well (too many different settings / combinations...), I have decided to create an additional class for creating framebuffer, that's embedded in the Framebuffer class called Builder. By the way, this approach is called Builder Pattern and in the link you can also learn a bit about it .
Here is how our Builder class looks like:
    /**
     * Subclass that builds a framebuffer object. Because of variety of options,
     * it's a lot more practical to create and configure framebuffer like this.
     */
    class Builder
    {
    public:
        /**
         * Creates and binds new framebuffer.
         *
         * @param width   New framebuffer width (in pixels)
         * @param height  New framebuffer height (in pixels)
         */
        Builder& createAndBind(GLsizei width, GLsizei height);

        /**
         * Adds color attachment with specified format.
         *
         * @param internalFormat  Internal format of the color data (e.g. GL_RGB8)
         */
        Builder& withColorAttachment(GLenum internalFormat);

        /**
         * Adds texture color attachment to the framebuffer with specified format.
         *
         * @param internalFormat  Internal format of the texture data (e.g. GL_RGB)
         */
        Builder& withTextureColorAttachment(GLenum internalFormat);

        /**
         * Adds depth attachment to the framebuffer.
         *
         * @param internalFormat  Internal format of the depth data
         */
        Builder& withDepthAttachment(GLenum internalFormat);

        /**
         * Finishes building and returns unique pointer to built framebuffer.
         */
        std::unique_ptr finishAndGetUnique();

        /**
         * Finishes building and returns shared pointer to built framebuffer.
         */
        std::shared_ptr finishAndGetShared();

    private:
        std::unique_ptr frameBuffer_; // Holds framebuffer that is being built
    };
This class provides us very convenient way of creating framebuffer, that can have so many different settings and having some universal constructor would be really like a coding anti-pattern. Let's quickly discuss the provided functions:
This approach has several advantages. First of all, we can build our framebuffer in a step-by-step fashion and the code doesn't get messy. Secondly, even if we start building framebuffer but somehow forget to finish it, internally the framebuffer under construction is stored within unique pointer and by the nature of it, if the builder is destroyed and the unique pointer too, then everything initialized until now gets properly released, so no forgetting to release some resource should really not happen no matter what! I'm not gonna go to the details of all the builder functions, they are basically same as we did in the previous tutorial, but what's new this time is withTextureColorAttachment and we should take a look at this one (other are written in the same fashion):
// This is a method from the builder and calls the method below
FrameBuffer::Builder& FrameBuffer::Builder::withTextureColorAttachment(GLenum internalFormat)
{
    if(frameBuffer_) {
        frameBuffer_->withTextureColorAttachment(internalFormat);
    }

    return *this;
}

bool FrameBuffer::withTextureColorAttachment(GLenum internalFormat)
{
    if (frameBufferID_ == 0) {
        return false;
    }

    // Create an empty texture with no data and same size as framebuffer has
    texture_ = std::make_unique();
    texture_->createFromData(nullptr, width_, height_, internalFormat, false);
    texture_->bind();
    glFramebufferTexture2D(GL_FRAMEBUFFER, GL_COLOR_ATTACHMENT0, GL_TEXTURE_2D, texture_->getID(), 0);
    return true;
}
As you can see, first, we make check if the framebuffer has actually been created and then we create a texture with no data (nullptr) and given internal format. The width and height of the texture are taken from the framebuffer. After creation, the texture is bound and the key ingredient to success is calling the method glFramebufferTexture2D. By calling this method, we attach the freshly created texture to the framebuffer as color attachment and now whole rendering will be done directly to the texture!
Now that we understand the theory behind rendering to a texture, we have to put it all together. In this tutorial, there is again class called World which is responsible for rendering the "gallery" with several screens, that have primitives rendered on them. Let's have a look how do we use the Framebuffer::Builder class to create a suitable framebuffer with rendering to a texture:
void World::initialize()
{
    // ...
    for(auto i = 0; i < 4; i++)
    {
        for (auto j = 0; j < 2; j++)
        {
            ScreenWithMesh screen;
            screen.frameBuffer = FrameBuffer::Builder()
                .createAndBind(currentTextureSize_, currentTextureSize_)
                .withDepthAttachment(GL_DEPTH_COMPONENT24)
                .withTextureColorAttachment(GL_RGB)
                .finishAndGetUnique();

            // ...
        }

        // ...
    }

    // ...
}
The rest of the code is not shown, because it's not that important at the moment, but as you can see, the creation of framebuffer object with this builder class is very convenient . Now let's analyze how the actual rendering of the gallery screens is done:
void World::renderScreensWithPrimitives(ShaderProgram& shaderProgram) const
{
    const auto& tm = TextureManager::getInstance();
    const auto& mm = MatrixManager::getInstance();

    // Pre-calculate model matrix of rendered meshes and the projection matrix
    const shader_structs::AmbientLight ambientLight(glm::vec3(1.0f, 1.0f, 1.0f));
    const auto viewMatrix = glm::lookAt(glm::vec3(0, 0, -20), glm::vec3(), glm::vec3(0, 1, 0));
    const auto projectionMatrix = glm::perspective(glm::radians(57.0f), static_cast(1024) / static_cast(1024), 0.5f, 150.0f);
    const auto meshModelMatrix = glm::rotate(glm::mat4(1.0f), glm::radians(meshesRotationAngle_), glm::vec3(0.0f, 1.0f, 0.0f));

    // Set the matrices and other uniforms of the shader program
    shaderProgram[ShaderConstants::viewMatrix()] = viewMatrix;
    shaderProgram[ShaderConstants::projectionMatrix()] = projectionMatrix;
    shaderProgram.setModelAndNormalMatrix(meshModelMatrix);
    ambientLight.setUniform(shaderProgram, ShaderConstants::ambientLight());
    shader_structs::DiffuseLight::none().setUniform(shaderProgram, ShaderConstants::diffuseLight());

    // Now let's render all the screens of the gallery - as first step, we have to render to the textures
    for(const auto& screen : screens_)
    {
        screen.frameBuffer->bindAsDraw();
        screen.frameBuffer->setFullViewport();
        glClear(GL_COLOR_BUFFER_BIT | GL_DEPTH_BUFFER_BIT);

        tm.getTexture(screen.meshTextureKey).bind();
        screen.mesh->render();
    }

    // Now let's draw again to the screen as before and render all the screens with textures we have rendered to
    SamplerManager::getInstance().getSampler("framebuffer").bind();
    FrameBuffer::Default::bindAsBothReadAndDraw();
    FrameBuffer::Default::setFullViewport();
    shaderProgram[ShaderConstants::projectionMatrix()] = mm.getProjectionMatrix();
    shaderProgram[ShaderConstants::viewMatrix()] = mm.getViewMatrix();

    for (const auto& screen : screens_)
    {
        auto modelMatrix = glm::translate(glm::mat4(1.0f), screen.position);
        modelMatrix = glm::scale(modelMatrix, screen.scale);
        shaderProgram.setModelAndNormalMatrix(modelMatrix);

        // Draw first the frame of the screen
        tm.getTexture("wood").bind();
        cube_->renderFaces(static_meshes_3D::CUBE_ALLFACES & ~screen.textureFaceBitmask);

        // Then draw the screen itself
        screen.frameBuffer->getTexture()->bind();
        cube_->renderFaces(screen.textureFaceBitmask);
    }
}
In the first step, we have to render all the meshes on the screens into their framebuffers/textures. Because we use same texture size on all screens and same matrices, we can pre-calculate view, projection and model matrices. Then we proceed with rendering the meshes into the textures (first for loop). When this is done, we can reset the normal drawing mode (onto the screen) and all the matrices that we had and now we can finally render the gallery screens by first rendering the picture frames (all faces of cube but the one with screen) and then the screen with the texture we have rendered to in the first step . And that's it, our first rendering to a texture is implemented!
This is what we have achieved today:
I really hope that this article was not too dense for you and that you have learned something new . In the end I don't even know why it took me so long to write this, but it's the usual problem of finding and reserving time for yourself and this gets harder the older I get . Nevertheless, I hope you have enjoyed it and you will put this new knowledge to good use .
 Download 4.84 MB (443 downloads)